Introduction
This indipyclient package provides classes used to communicate to an INDI server. In particular your script can import and create an instance of the ‘IPyClient’ class.
INDI - Instrument Neutral Distributed Interface.
See https://en.wikipedia.org/wiki/Instrument_Neutral_Distributed_Interface
INDI is often used with astronomical instruments, but is a general purpose protocol which can be used for any instrument control.
The INDI protocol defines the format of the data sent, such as light, number, text, switch or BLOB (Binary Large Object). The client takes the format of switches, numbers etc., from the protocol.
The IPyClient object has an asyncrun() coroutine method which needs to be awaited, typically gathered with your own tasks. The client transmits a ‘getProperties’ request (this indipyclient package does this for you on connecting).
The server replies with definition packets (defSwitchVector, defLightVector, .. ) that define the format of the instrument data.
The indipyclient package reads these, and its IPyClient instance becomes a mapping of the devices, vectors and member values.
For example, if ipyclient is your instance of IPyClient:
ipyclient[devicename][vectorname][membername] will be the value of a particular parameter.
A ‘vector’ is a collection of members, so a switch vector may have one or more switches in it.
As the instrument produces changing values, the server sends ‘set’ packets, such as setSwitchVector, setLightVector …, these contain new values, which update the ipyclient values. They also cause the ipyclient.rxevent(event) method to be called, which you could overwrite to take any actions you prefer.
To transmit a new value you could call the ipyclient.send_newVector coroutine method.
Indipyclient can be installed from Pypi with:
pip install indipyclient
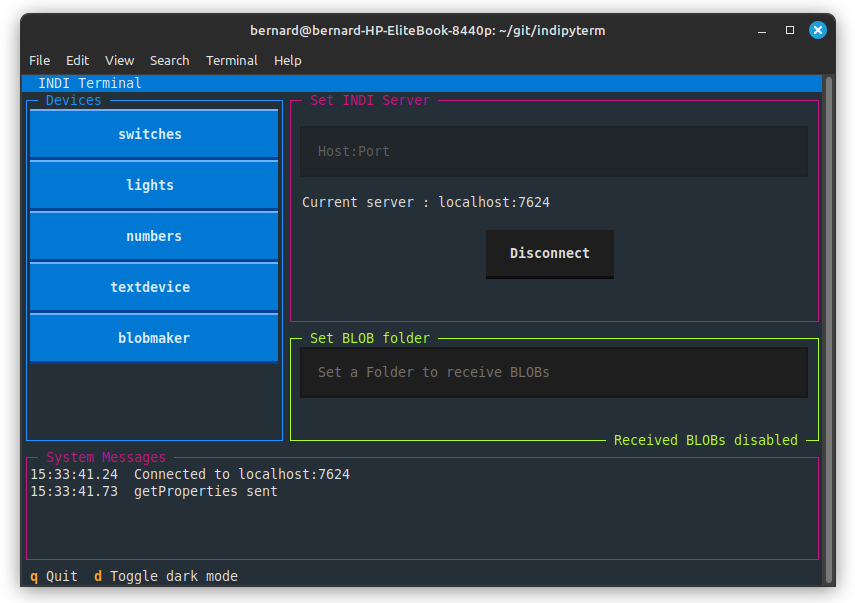
indipyterm
indipyclient is a library only, which can be used to create a client or client scripts controlling the devices. However ‘indipyterm’ is available if you prefer a full ready-made client. It is a terminal client which has the advantage that with a headless setup, a remote user can simply SSH to the server and run the client.
indipyterm uses IPyClient to do the work and the framework ‘textualize’ to create the display.
indipyterm can be installed from Pypi.
https://pypi.org/project/indipyterm
The client can be run from a virtual environment with
indipyterm [options]
or with
python3 -m indipyterm [options]
If you use uv, it can be very simply run directly from Pypi with
uvx indipyterm [options]
The package help is:
usage: indipyterm [options]

Terminal client to communicate to an INDI service.

options:
  -h, --help               show this help message and exit
  --port PORT              Port of the INDI server (default 7624).
  --host HOST              Hostname/IP of the INDI server (default localhost).
  --blobfolder BLOBFOLDER  Optional folder where BLOB's will be saved.
  --version    show program's version number and exit
A typical session would look like:
Further information about indipyterm can be found from:
https://github.com/bernie-skipole/indipyterm
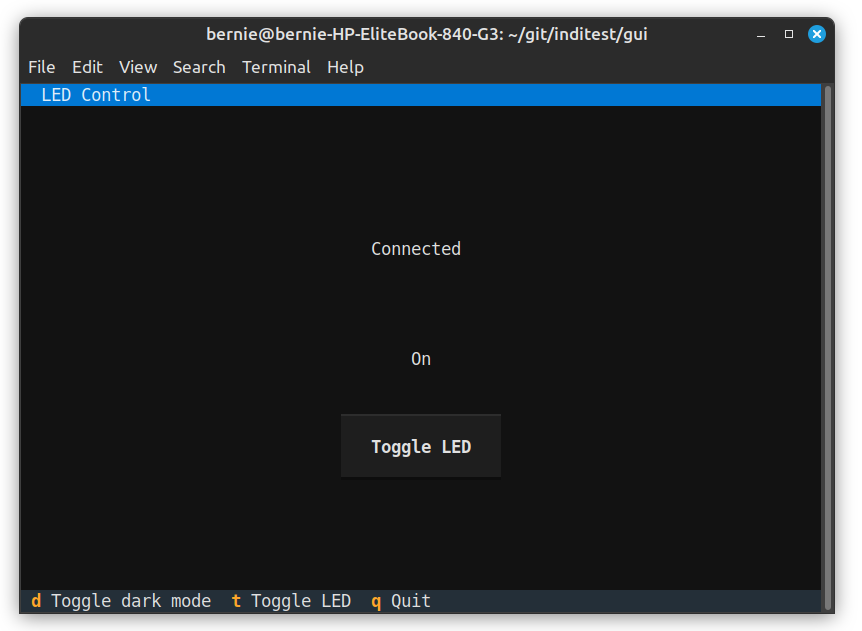
Using indipyclient and textual it would be possible to write your own terminal clients, dedicated to a specific instrument. By being dedicated to a known device, vector and member, it does not need to ‘learn’ about remote devices but can simply display the expected instrument, making creating a specialist client much easier, nevertheless this would require a good knowledge of textual. A simplified example, (ledclient4.py) has been written at:
https://github.com/bernie-skipole/inditest/tree/main/gui
This is not general purpose, but is dedicated to controlling an LED driver, also listed in the above directory. A screenshot is shown below:
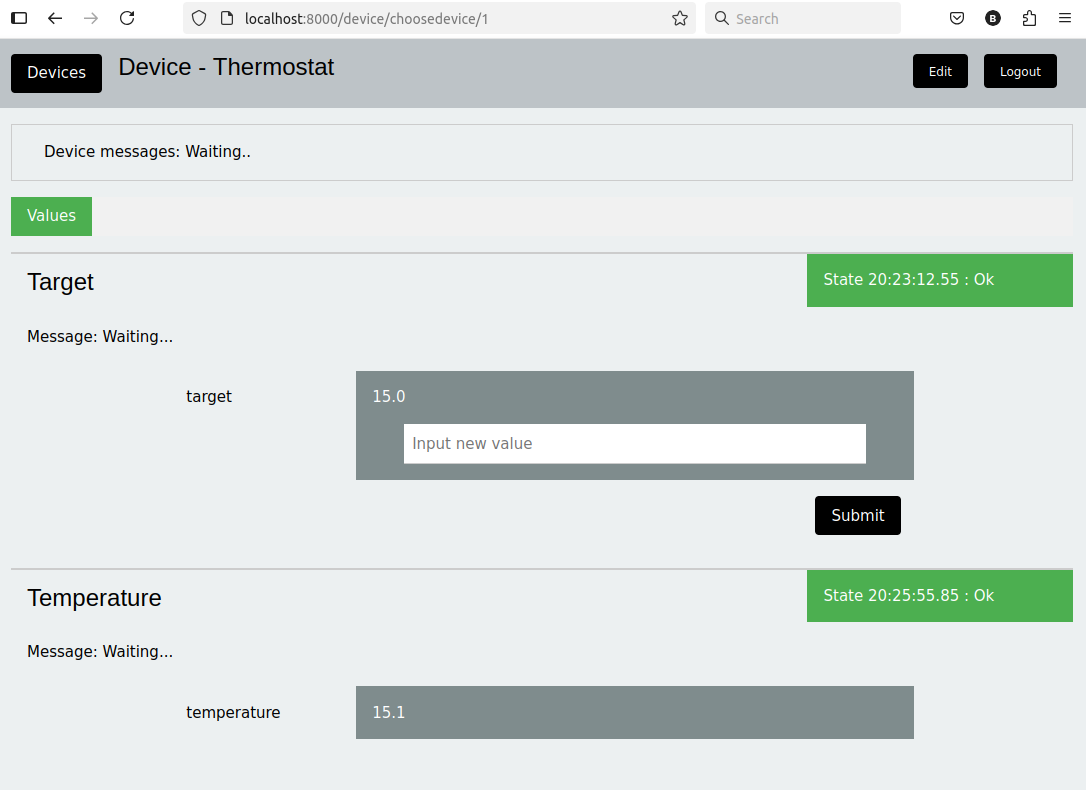
indipyweb
The associated package indipyweb provides a client which serves web pages, and is also available from Pypi, again behind the scenes this uses indipyclient.
https://pypi.org/project/indipyweb
The client can be run from a virtual environment with
indipyweb [options]
or with
python3 -m indipyweb [options]
The package help is:
usage: indipyweb [options]

Web server to communicate to an INDI service.

options:
  -h, --help                   show this help message and exit
  --port PORT                  Listening port of the web server.
  --host HOST                  Hostname/IP of the web server.
  --dbfolder DBFOLDER          Folder where the database will be set.
  --securecookie SECURECOOKIE  Set True to enforce https only for cookies.
  --version                    show program's version number and exit

The host and port set here have priority over values set in the database.
If not given, and not set in the database, 'localhost:8000' is used.
The database file holds user and INDI port configuration, and can be
populated via browser using the 'edit' button.
If it does not already exist, a database file will be created in the
given db folder, or if not set, the current working directory will be used.
A newly generated database file will contain a single default username
and password 'admin' and 'password!'. These should be changed as soon as
possible and the INDI host/port set (default localhost:7624).
The securecookie argument is 'False' by default, if using a reverse
proxy providing https connectivity, set securecookie to the string 'True'
to ensure loggedin cookies can only pass over https.
A typical session would look like:
Further information about indipyweb can be found from: